How did I create the Telegram Bot
Simple explantaion in just a few words
Why do I need the bot?
Well, if you are asking this question – probably you don’t need a bot. In general, bots are great. I needed a way to get fast and free operational notifications to my cellphone. I could achieve it in several ways, the simplest one - was to get AWS SNS notification by e-mail. SNS is a great tool, but this is what you get out of the box:

Looks not so evident, and you need time to understand what is happening. I was too lazy to change anything in this, until COVID-19 made all of us stay at home. So during a weekend at home I thought that it would be greate to get fast notifications, instead of messy e-mails from AWS.
As an addition I wanted to manage some actions (like CDN invalidation) with simple commands from Telegram.
The design.
Telegram has API, where you can manage your bot with simple queries. To send a message you need only one GET request.
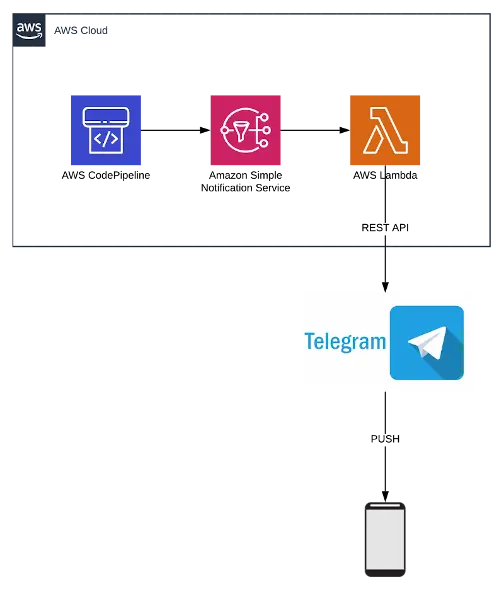
CodePipeline notifications going to SNS, that is using Lambda subscription. Lambda extracts the needed data from notification and sends the message to Telegram bot with HTTP call.

So receiving notifications is simple. On the other hand, I need to send back some commands – for example to invalidate the CDN paths (fully or partially).
For this task there is a possibility in Telegram to send web hooks, each time anything is posted to the chat. The webhook will be sent to API-Gateway, Lambda function will be used as a backend.
Lets implement!
First, you need to create a bot. Telegram has botfather for this. The first step is to create your own bot: send the following to botfather
/newbot "botname"
Botfather will do everything for you in an easy and interactive way. As an output you will get the bot token. You need to save it securely.
Now it’s high time to send the first message to your bot. Just type anything and send it to the bot. You need an existing chat for the next steps.
You need your ${CHAT_ID} to send messages.
To get the ${CHAT_ID} you might use getUpdates API:
curl https://api.telegram.org/bot${YOUR_TOKEN}/getUpdates
You need the chat entity from the output. Inside chat object, there is an id, that we need. Now we are ready to send our first message to the bot:
curl "https://api.telegram.org/bot${YOUR_TOKEN}/sendMessage?parse_mode=Markdown&text=test&chat_id=${CHAT_ID}"
Magic happened! You got the message!
Now we need to implement the 2nd part of the magic – prepare the lambda function, that will notify us on changes in our pipeline. The function should be triggered by SNS topic, all required permissions should be set in IAM role.
import json
import urllib.request
import os
import boto3
from urllib.parse import quote


bot_token = os.environ['TOKEN']
bot_chat_id = os.environ['CHAT_ID']

def notify(msg):
    send_text = 'https://api.telegram.org/bot' + bot_token + '/sendMessage?chat_id=' + bot_chat_id + '&parse_mode=Markdown&text=' + quote(msg)
    response = urllib.request.urlopen(send_text)

def lambda_handler(event, context):
    sns_message = json.loads(event["Records"][0]["Sns"]["Message"])
    pipeline_state = sns_message["detail"]["state"]

    message_text = "Deployment of site *"+ pipeline_state+"*"
    if pipeline_state == "SUCCEEDED":
        message_text = message_text + "\nIf you want to invalidate CDN please use [/help](/help) to see the list of the options"

    response = notify(message_text)
As you probably noticed, telegram gets the Markdown syntax to format the messages.
One more part that should be implemented is the commands, that I would like to send to my AWS Account. There are different commands for different cases: help, clear CDN cache.
import json
import urllib.request
import os
import boto3
from urllib.parse import quote
from datetime import datetime

bot_token = os.environ['TOKEN']
bot_chat_id = os.environ['CHAT_ID']
d_id = os.environ['DISTRIBUTION_ID']

cmd_list=["update_all","update_notes","update_cv","help"]
desc_list=["All CDN invalidation","notes CDN invalidation","cv CDN invalidation","This message"]

def invalidate_cdn(d_id,cdn_items):
    cfclient = boto3.client('cloudfront')
    # current date and time
    now = datetime.now()

    timestamp = str(datetime.timestamp(now)).replace(".","")


    response = cfclient.create_invalidation(
        DistributionId = d_id,
        InvalidationBatch={'Paths':
            {
                'Quantity': 1,
                'Items': cdn_items,
            },
            'CallerReference': timestamp
            })

def notify(msg):
    send_text = 'https://api.telegram.org/bot' + bot_token + '/sendMessage?chat_id=' + bot_chat_id + '&parse_mode=Markdown&text=' + quote(msg)
    response = urllib.request.urlopen(send_text)

def help():
    cmd_index = 0
    msg = ""
    for cmd in cmd_list:
        msg = msg + "[/"+ cmd + "](/" +cmd +")" + " – " + desc_list[cmd_index] + "\n"
        cmd_index += 1

    print(notify("*The following commands are available:*\n\n"+ msg))

def update_all():
    invalidate_cdn(d_id,['/*'])
    notify("Invalidated All")

def update_notes():
    invalidate_cdn(d_id,['/notes/*'])
    notify("Invalidated NOTES section")

def update_cv():
    invalidate_cdn(d_id,['/notes/*'])
    notify("Invalidated CV section")


def lambda_handler(event, context):

    got_cmd = json.loads(event["body"])["message"]["text"].replace("/","")
    print(got_cmd)
    if got_cmd in cmd_list:
        eval(got_cmd+"()")

    return {
        'statusCode': 200,
        'body': json.dumps('OK')
    }
Now, if the message will contain one of the commands (defined in cmd_list) – the relevant function will be called.
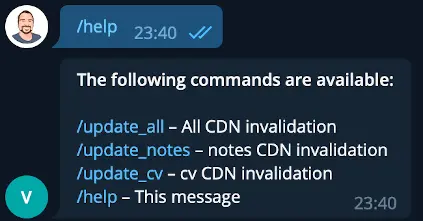
So, the /help command will return the help screen:

The other commands will call appropriate function.
And the final step is to secure your deployed API-Gateway. As simplest solution – the source IP addresses will be locked to Telegram API Sources (can be gathered here). The IP restriction can be set on API-Gateway with proper resource policy:
{
    "Version": "2012-10-17",
    "Statement": [
        {
            "Effect": "Allow",
            "Principal": "*",
            "Action": "execute-api:Invoke",
            "Resource": "arn:aws:execute-api:eu-west-1:111111111111:zzzzzzzzzz/*/*/*"
        },
        {
            "Effect": "Deny",
            "Principal": "*",
            "Action": "execute-api:Invoke",
            "Resource": "arn:aws:execute-api:eu-west-1:111111111111:zzzzzzzzzz/*/*/*",
            "Condition": {
                "NotIpAddress": {
                    "aws:SourceIp": [
                        "149.154.160.0/20",
                        "91.108.4.0/22"
                    ]
                }
            }
        }
    ]
}
That’s it! Enjoy!